Sewing Machine Stitches Not Catching – How to fix?
Sewing is a beautiful and rewarding craft that allows us to express our creativity and create one-of-a-kind masterpieces. However, there’s nothing more frustrating than sitting down at your sewing machine, excited to start a new project, only to find that the stitches are not catching properly.
Sewing Machine Stitches Not Catching – How to Fix?
In this article, we will help you to overcome the common problem of sewing machine stitches not catching. Whether you’re a beginner or an experienced seamstress, this guide will equip you with the knowledge and techniques to troubleshoot and fix the issue.
17 Common Sewing Machine Problems & Their Quick Fixes:
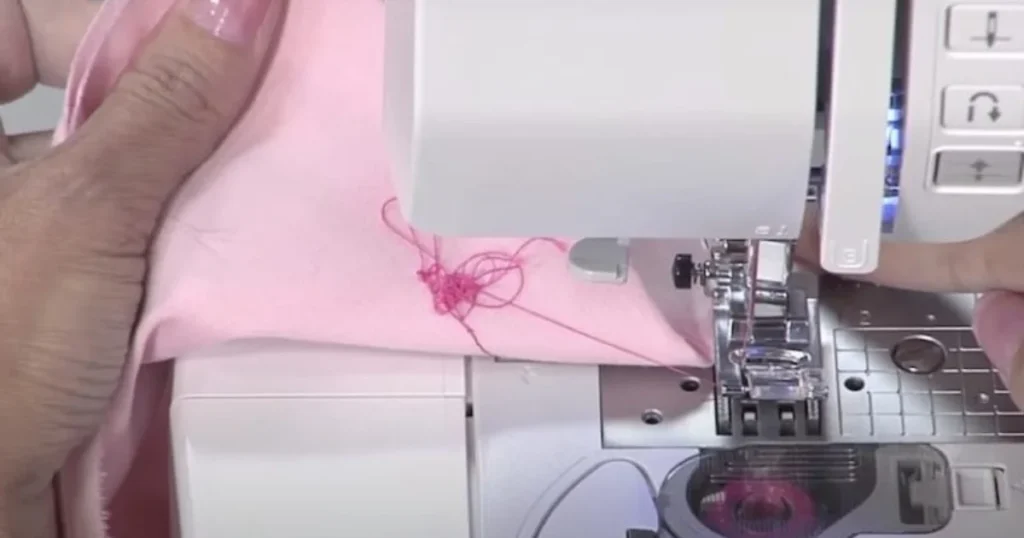
Problem 1: Thread bunching up under your fabric when sewing
If you’re seeing knots of extra thread on the underside of your sewing, there are several likely culprits.
Reason:
One possible reason for thread bunching up is incorrect machine threading. If the thread is not properly threaded through the tension discs or the take-up lever, it can cause the thread to bunch up under the fabric.
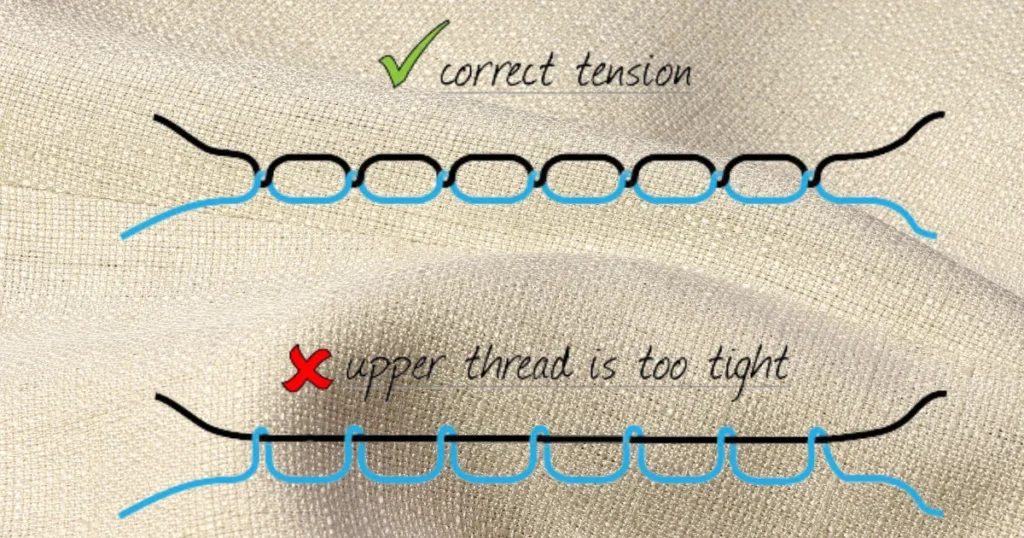
Another reason could be incorrect tension settings. If the tension is too tight, the thread can bunch up.
Solution:
- First, remove your sewing from the machine. You may have to cut through all the extra thread to free it, but avoid pulling it loose, as it can damage the mechanism of your machine and your fabric.
- Once your project is freed, carefully remove all the cut bits of thread as well.
- Now you can identify the issue. Start by re-threading the machine, following the threading schematic in your machine’s manual. Make sure the presser foot is up while threading to ensure proper tension release.
- Check that the thread is correctly threaded through the tension discs and the take-up lever.
- Adjust the tension settings, if necessary, by turning the tension dial or knob. Test on a scrap piece of fabric to ensure everything is correct.
Problem 2: Bent or broken needles
Your needle becomes bent or breaks while sewing, causing issues with stitching.
Reason:
There are a few reasons why needles can become bent or broken. One common reason is using the wrong type or size of needle for the fabric you’re sewing.
For example, using a lightweight needle on heavy fabric can cause it to bend or break. Another reason could be hitting a pin or a hard object while sewing, which can cause the needle to bend or break.
Solution:
- Always use a new needle for a new project to prevent dullness or damage to the fabric.
- Use the right type of needle for the project (e.g., ballpoint needle for knit fabrics, sharp needle for leather).
- Check that your presser foot is properly installed and not causing any interference with the needle.
- If a needle breaks or bends, stop sewing immediately. Remove the broken needle and replace it with the correct type.
- If breaking or bending continues, there may be underlying mechanical issues that require expert repair.
Problem 3: Fabric not feeding
The fabric is not moving smoothly through the machine while sewing, causing uneven stitches or fabric bunching.
Reason:
One possible reason for inconsistent fabric feed is incorrect pressure on the presser foot. If the pressure is too high or too low, it can affect the fabric feed.
Another reason could be worn-out or dirty feed dogs. The feed dogs are the small metal teeth that help move the fabric through the machine. If they are worn out or dirty, they may not grip the fabric properly, resulting in inconsistent feed.
Solution:
- Check the pressure of your presser foot and adjust it according to the fabric you’re sewing. If the fabric is thick, increase the pressure. If it’s delicate, decrease the pressure.
- Clean the feed dogs and the surrounding area. Use a brush or a lint roller to remove any lint or debris. If the feed dogs are worn out, they may need to be replaced.
- Ensure the fabric is properly positioned and fully under the presser foot before starting to sew.
- If the fabric still doesn’t feed properly, try using a walking foot attachment, which can help with even fabric feeding.
Problem 4: The thread keeps breaking
The thread repeatedly breaks while sewing, interrupting the stitching process.
Reason:
There are several reasons why the thread may keep breaking. One common reason is using a low-quality or old thread that is prone to breakage. Another reason could be incorrect tension settings.
If the tension is too tight, it can strain the thread excessively and cause it to break. Using the wrong needle size or type for the thread can also lead to thread breakage.
Solution:
- Check the type of thread being used. Avoid delicate threads designed for hand sewing. Use a high-quality thread suitable for machine sewing.
- Ensure the top and bottom threads are of the same weight. Mismatched thread weights can cause tension issues and thread breakage.
- Re-thread the top thread with the presser foot up to ensure proper tension release.
- Lower the tension settings for the top thread if issues persist.
- Use the correct needle size and type for the thread you’re using. For guidance, consult your machine’s manual or needle packaging.
RELATED POST: How to thread a sewing machine?
Problem 5: The machine is skipping stitches
The machine occasionally skips stitches, resulting in incomplete or uneven stitching.
Reason:
There are a few possible reasons for skipped stitches. One common reason is using a dull or damaged needle. A dull needle may not penetrate the fabric properly, causing skipped stitches.
Another reason could be incorrect needle installation or incorrect needle type for the fabric being sewn. Timing issues in the machine can also cause skipped stitches.
Solution:
- Check that the needle is installed correctly and is the right type for your fabric. Ensure it is fully inserted and facing the correct direction.
- Replace the needle if it is dull or damaged. Always use a new needle for each project.
- Use the correct needle type for the fabric you’re sewing. For example, use a ballpoint needle for knit fabrics and a sharp needle for woven fabrics.
- Re-thread both the top and bobbin threads, ensuring they are properly threaded through the tension discs and the take-up lever.
- Test on a scrap piece of fabric to ensure everything is correct.
- If the machine is still skipping stitches, there may be underlying mechanical issues that require professional repair.
RELATED POST: How to fix sewing machine not stitching
Problem 6: Bobbin tension is not consistent
The tension of the bobbin thread varies, causing uneven stitches and frustration.
Reason:
Several factors can cause inconsistent bobbin tension. One common reason is incorrect bobbin threading. If the bobbin is not threaded properly or if the thread is not properly seated in the tension spring, inconsistent tension can result.
Another reason could be using a low-quality or old bobbin thread that is prone to tension issues.
Solution:
- Check the bobbin for wear, especially if you are using plastic bobbins. If necessary, switch to a new metal bobbin.
- Ensure the bobbin is properly threaded and the thread is seated securely in the tension spring.
- If your machine allows for it, adjust the bobbin tension. Consult your machine’s manual for instructions on adjusting bobbin tension.
- Test on a scrap piece of fabric to ensure the bobbin tension is consistent with the top thread tension.
Problem 7: Seams in stretch fabrics coming out wavy
When sewing stretch fabrics, it’s not uncommon for seams to come out wavy.
Reason:
Wavy seams in stretch fabrics can be caused by both sewing machine issues and technique problems. One common reason is incorrect tension settings.
If the tension is too tight, the fabric can pucker and create wavy seams. Another reason could be using the wrong type of needle or incorrect stitch length for stretch fabrics.
Solution:
- Support the entirety of your project while sewing to prevent fabric stretching. Use your hands to guide the fabric gently and evenly through the machine.
- Let the feed dogs do the work and avoid pulling on the fabric. Excessive pulling can stretch the fabric and result in wavy seams.
- Pin well before sewing to ensure the fabric layers stay aligned during stitching.
- Adjust the pressure of the presser foot or switch to a walking foot attachment, which can help with even fabric feeding.
- Use the correct needle type and size for stretch fabrics. A ballpoint or stretch needle is recommended.
- Adjust the tension settings for stretch fabrics. Test on a scrap piece of fabric to find the optimal tension for your specific fabric.
READ MORE: Best Sewing Machine For Heavy Fabrics
Problem 8: The sewing machine seizes up or won’t sew
Your sewing machine may seize up or refuse to sew.
Reason:
There are a few potential causes for a sewing machine to seize up or not sew. One common reason is attempting to sew fabric that is too tough for the machine.
Sewing heavy or thick fabrics without the appropriate machine or needle can cause the machine to seize up. Another reason could be incorrect needle installation or timing issues in the machine.
Solution:
- If the fabric is too tough for the machine, stop sewing to prevent damage. Switch to a machine or needle designed for heavy-duty sewing.
- Check that the needle is installed correctly and is the right type for your fabric. Ensure it is fully inserted and facing the correct direction.
- Clean the machine according to the manual’s instructions to remove lint and debris that may be causing issues.
- If the machine continues seizing up or won’t sew, underlying mechanical issues may require professional repair.
Problem 9: The needle comes unthreaded before sewing
The needle becomes unthreaded just before starting to sew.
Reason:
The needle may come unthreaded due to incorrect threading or tension issues. If the thread is not properly threaded through the tension discs or the take-up lever, it can easily become unthreaded.
Incorrect tension settings can cause the thread to pull out of the needle.
Solution:
- Ensure the needle is at its highest point before threading the machine. Wind the handwheel toward yourself to raise the needle.
- Check that the thread is correctly threaded through the tension discs and the take-up lever.
- Adjust the tension settings, if necessary, by turning the tension dial or knob. Test on a scrap piece of fabric to ensure everything is correct.
READ MORE: How to Choose the Right Sewing Machine Needle
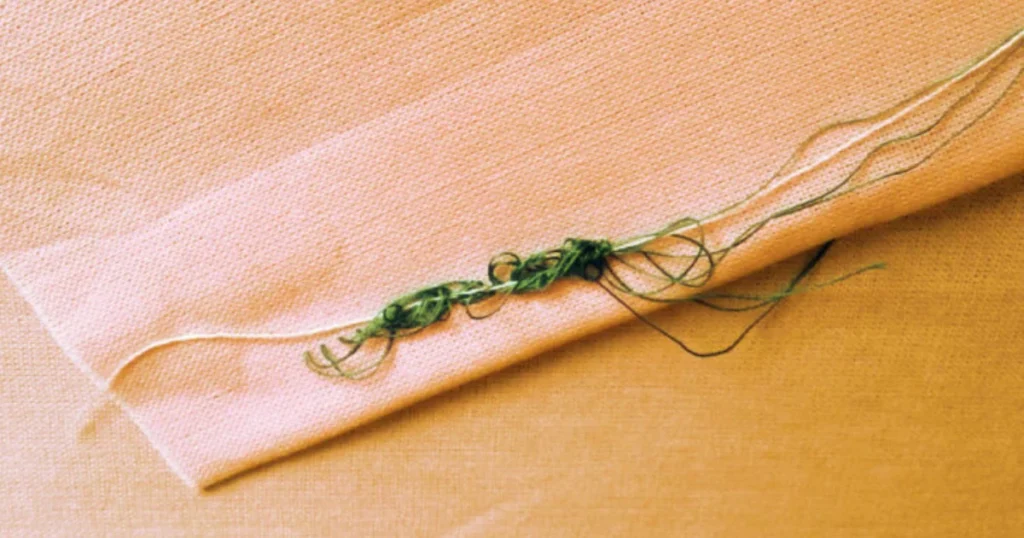
Problem 10: Fabric or threads bunching at the start or ends of seams
Fabric or threads bunch up at the beginning or end of seams, resulting in messy stitching.
Reason:
Bunching at the start or end of seams can be caused by a few factors. One common reason is not sewing a few millimetres into the fabric before backstitching at the start of seams.
This can cause the fabric to bunch up as the stitches are not properly anchored. Another reason could be sewing too close to the edge when ending a seam, resulting in fabric or thread bunching.
Solution:
- Sew an extra few millimeters into the fabric before backstitching at the start of the seams. This will anchor the stitches and prevent bunching.
- When ending a seam, backstitch before reaching the edge, then sew straight off the edge for a clean finish. This will prevent fabric or thread bunching at the seam ends.
Problem 11: Thread inconsistently knots, loosens, or tangles
The thread knots loosen or tangles during sewing, causing frustration and interruptions.
Reason:
Thread knots loosen, or tangles can occur for various reasons. One common reason is using low-quality or old thread that is prone to tangling.
Another reason could be incorrect tension settings. If the tension is too tight or too loose, the thread can knot or loosen.
Solution:
- Regularly clean the machine to remove lint and dust that can cause issues. Follow the manufacturer’s instructions for cleaning, avoiding compressed air cans that may drive lint further into the mechanism.
- Check the tension settings for the top thread. Adjust the tension dial or knob to achieve the correct tension for your fabric. Test on a scrap piece of fabric to ensure the thread is not knotting or loosening.
- Use high-quality thread suitable for machine sewing. Avoid using old or damaged thread.
Problem 12: Thread fraying, shredding, and breaking
The thread frays, shreds, or breaks easily during sewing, resulting in weak stitches.
Reason:
Thread fraying, shredding, or breaking can occur for several reasons. One common reason is using low-quality or old thread that is prone to fraying.
Another reason could be using the wrong needle size or type for the thread, which can cause excessive friction and thread damage.
Solution:
- Ensure the thread and needle sizes are compatible. Use a needle size appropriate for the thread thickness.
- Use high-quality thread suitable for machine sewing. Avoid using old or damaged thread.
- Check the needle for any burrs or rough spots that could be causing thread damage. Replace the needle if necessary.
- Adjust the tension settings for the top thread. Test on a scrap piece of fabric to ensure the thread is not fraying, shredding, or breaking.
READ MORE: Sewing machine skipping stitches and shredding thread
Problem 13: Fabric feed is inconsistent
The fabric feed is uneven, causing stitches to be unevenly spaced or distorted.
Reason:
Inconsistent fabric feed can be caused by various factors. One common reason is worn-out or dirty feed dogs. The feed dogs are the small metal teeth that help move the fabric through the machine.
If they are worn out or dirty, they may not grip the fabric properly, resulting in inconsistent feed. Another reason could be incorrect pressure on the presser foot, causing the fabric to slip or bunch.
Solution:
- If the machine is older, the feed dogs may need replacement. Consult a professional for assistance.
- Clean around the feed dogs, especially if the machine has a drop-feed function. Use a brush or lint roller to remove any lint or debris.
- Increase the pressure of the presser foot to ensure even contact with the feed dogs. Consult your machine’s manual for instructions on adjusting the presser foot pressure.
Problem 14: The machine is making strange noises
The sewing machine produces unusual or loud noises during operation, indicating a potential issue.
Reason:
Unusual or loud noises from the sewing machine can indicate underlying mechanical issues. They could indicate a problem with the motor, gears, or other internal components.
It’s important to address these issues to prevent further damage to the machine.
Solution:
- Stop sewing and clean the machine according to the manual’s instructions. Remove any lint or debris that may be causing the noise.
- Test on scrap fabric after cleaning. If unusual noises persist, it’s best to take the machine to a professional for inspection and repair.
Problem 15: The machine is running, but the needle won’t move!
The sewing machine is turned on, but the needle fails to move when the foot pedal is pressed.
Reason:
There are a few potential causes for the needle not moving when the machine is running. One common reason is the machine being in bobbin-winding mode.
When the machine is set to wind the bobbin, the needle will not move. Another reason could be a mechanical issue with the machine, such as a disconnected or broken drive belt.
Solution:
- Check if the machine is set in bobbin-winding mode. If so, adjust the bobbin’s lever or winding post to the correct position.
- Ensure the machine is properly threaded and the bobbin is correctly inserted.
- If the machine is still not working, there may be a mechanical issue that requires professional repair.
FAQs:
Why is my sewing machine not stitching tight?
If your sewing machine is not stitching tight, it could indicate that the tension is too loose on both the bobbin and needle thread. Check if the machine has been threaded correctly and if the thread has been placed properly between the tension mechanism.
Why are my stitches not staying?
Sewing machine stitches that don’t catch can be attributed to a needle problem. It could be due to a bent or blunt needle or improper insertion. Try inserting a new needle, even if you recently changed it. You can also select a different type or size of the needle. If you’re missing stitches, consider going up one size.
What tension should a sewing machine be at for thick fabric?
When sewing thick fabric, it is generally recommended to adjust the tension settings on your sewing machine. You may need to increase the tension slightly to ensure proper stitch formation and prevent loose stitches. It is advisable to test the tension on a scrap piece of fabric before starting your project.
Why do my stitches keep opening?
If improper suture techniques are used, stitches may keep opening. Suture breakage can occur for various reasons, including inappropriate materials, irregular application angles, improper suture material or size, and excessive suture tension. It is important to ensure proper technique and use the right tools and materials for the type of stitching being done.
Read Also: Sewing Machine Not Stitching On Bottom
Conclusion:
Troubleshooting sewing machine issues can be a breeze with the right knowledge and steps. By understanding the common causes of problems that cause sewing machine stitches to not catch, such as skipped stitches, thread tension issues, and needle breakage, you can confidently tackle these challenges and ensure smooth sewing experiences.
Follow the solutions provided for each problem, from adjusting tension settings to proper needle selection and machine maintenance.
Remember, with a little patience, practice, and the right problem-solving techniques, you can overcome any challenge if your sewing machine stitches not catching. Happy stitching!