How To Sew A Button – Ultimate Guide
A few years ago, I was attending a business dinner in New York City when disaster struck. The dress shirt I had brought along suddenly betrayed me; the collar felt impossibly tight, and I couldn’t get the top button to close. On a normal day, I would’ve shrugged it off and gone without a tie, but this was a formal affair, and showing up with an open collar wasn’t an option.

Source: Pinterest
With only 30 minutes before the event, I quickly asked the hotel front desk if they had a sewing kit. Five minutes later, I was back in my room, scissors in one hand, needle and thread in the other. I carefully snipped off the stubborn button and reattached it about three-quarters of an inch over. The fit wasn’t perfect; it was still a little snug, but at least the shirt closed, and I walked into that dinner looking sharp instead of sloppy.
That night made me realize something: most guys don’t know how to sew a button. It’s one of those small life skills we often ignore, assuming someone else, maybe mom, a wife, or even a dry cleaner, will take care of it. But the truth is, you never know when you’ll need to rely on yourself.
Learning to sew on a button is simple, quick, and incredibly useful. And once you know how, you’ll never panic over a popped button again.
Tools and Materials You’ll Need to Sew A Button
Before you sit down to sew on a button, make sure you have the right supplies ready. Having everything at hand will make the job quicker and less frustrating.
-
Button
Ideally, use the original button that came with your shirt or jacket. If it’s lost, check the inside hem or care label. Most garments come with a spare button stitched somewhere out of sight. If not, choose a replacement that matches in size and color. Keep in mind that some buttons have two holes, while others have four. The method below focuses on four-hole buttons but can be easily adapted for two-hole versions. -
Thread
Go for a thread that blends with your garment for a clean look. If you don’t have an exact match, black, navy, or even white can often pass unnoticed. You’ll need around 12 inches of thread (double that if you plan to fold it for extra strength, which also makes knotting easier). -
Needle
Any basic sewing needle works, but slimmer ones make threading and stitching easier. If possible, keep two needles handy in case one bends or breaks. -
Scissors or Cutting Tool
Sharp scissors are best for trimming excess thread. In a pinch, you can use a small knife or even your teeth though the result may not be as neat. -
Thimble (Optional but Helpful)
If you’re working with thick fabrics like coats or denim, a thimble can save your fingers from painful jabs and help push the needle through. -
Emergency Sewing Kit (Travel Hack)
When you’re on the road, don’t count on luck; buttons always seem to pop off at the worst possible moment. Many hotels keep small sewing kits at the front desk, so don’t hesitate to ask. Better yet, pack your own compact sewing kit in your bag or car. It takes up almost no space and can save you from an awkward wardrobe malfunction.
How to sew a button?
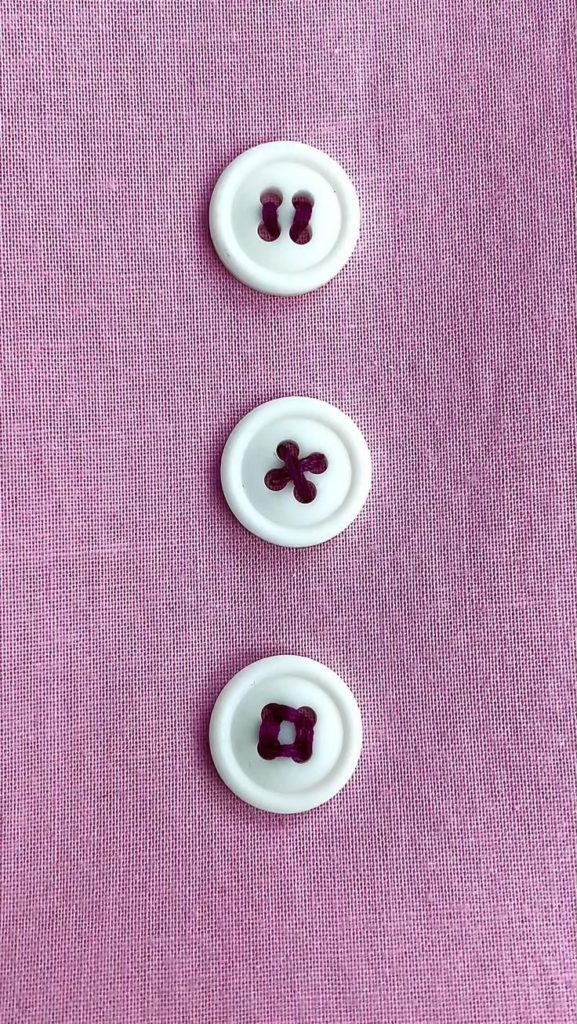
Sewing on a two-hole button is a simple process:
- Thread your needle and tie a knot at the end of the thread.
- Position the button on the fabric where you want it to be.
- Push the needle up through the fabric from the underside, through one of the buttonholes, and then down through the other buttonhole and fabric.
- Repeat this process several times, making sure the thread is taut but not too tight.
- On the last stitch, push the needle up through the fabric but not through the buttonhole.
- Wrap the thread around the stitches between the button and the fabric several times.
- Push the needle back down through the fabric and tie a knot on the underside.
READ ALSO: How to Use a Sewing Machine for Beginners?
Tips and Tricks for Successful Button Sewing
- Use a thimble to protect your finger and make it easier to push the needle through thick fabrics.
- Choose a thread that matches the color of your garment or button for a seamless finish.
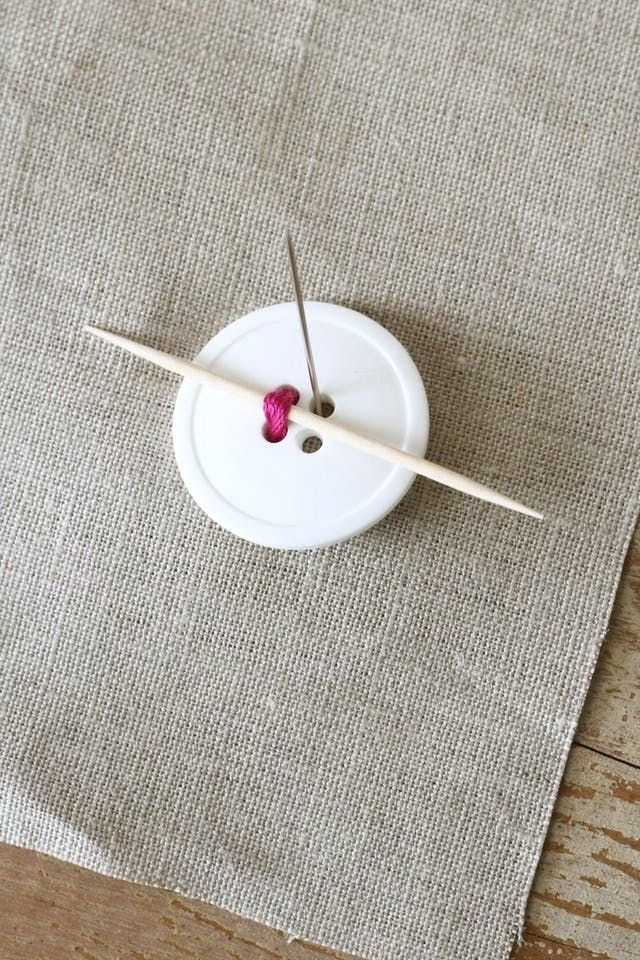
- Use a pin or toothpick as a spacer between the button and the fabric to create the proper amount of slack.
- If sewing a button on a thick or heavy fabric, create a shank to give the button some room to fit through the buttonhole comfortably.
- Sew buttons securely by going back and forth through the buttonholes and fabric multiple times to create a strong attachment.
Why is Sewing Buttons a Useful Skill?
Source: Pinterest
Learning how to sew buttons provides several benefits:
-
Saves Money
Sewing buttons yourself can save you money that would otherwise be spent on repairs or replacements. You won’t need to pay a tailor or seamstress to fix a missing button or replace a damaged one.
-
Increases Clothing Lifespan
By repairing buttons promptly, you can extend the lifespan of your clothing. You can prevent buttons from falling off or becoming loose, which can lead to further damage, such as tearing or fraying.
-
Convenience
Knowing how to sew buttons is a valuable skill that enables you to repair clothing on the go. You won’t need to wait for someone else to help you or take your clothes to a repair shop. Instead, you can quickly fix a missing button and continue wearing your clothes.
-
Personalization
Sewing on unique or decorative buttons can add a personal touch to your clothing or accessories. You can make your clothing stand out by choosing buttons that complement your style and personality.
Button Types and Applications
Buttons come in various types and styles, each with its unique features and applications. Here are some common button types and their uses:
Flat buttons: These are the most common type of buttons and are used for general-purpose applications on shirts, blouses, and lightweight fabrics.
Shank buttons: These buttons have a loop or shank on the back, making them ideal for thicker or heavier fabrics, such as coats or jackets.
Toggle buttons: These buttons feature a bar or loop that secures the button, making them suitable for jackets, coats, and other heavy-duty garments.
Decorative buttons: These buttons are used for embellishment purposes and come in various shapes, sizes, and styles. They are often used on accessories, such as bags, hats, or jewelry.
READ HERE: Sewing Machine Not Stitching On Top- Fix it?
Common mistakes you must avoid while sewing a button
Source: Pinterest
Avoid these common mistakes when sewing buttons:
- Using the wrong size or style of button for the garment or project.
- Not anchoring the thread securely at the beginning leads to loose buttons.
- Make sure not to create a shank for thicker or heavier buttons, resulting in a tight fit through the buttonhole.
- Keep in mind that not sewing the button tightly enough causes it to come loose over time.
- Not aligning the button properly with the markings results in uneven or crooked buttons.
Alternative Button Sewing Techniques
While sewing is the most common method for attaching buttons, there are alternative techniques that can be used in certain situations.
Here are some examples:
Snap buttons: Snap buttons are attached using a special tool that snaps the two halves of the button together. They are often used for fastening lightweight fabrics, such as baby clothes or lightweight garments.
Hook and loop fasteners: Hook and loop fasteners, such as Velcro, can be used as an alternative to buttons for fastening lightweight fabrics or for garments that need to be opened and closed frequently, such as children’s clothing or bags. They are easy to use and provide a convenient closure option.
Button sewing machine: In some cases, especially in mass production or professional settings, a button sewing machine can be used to attach buttons quickly and efficiently. These machines are specifically designed for sewing buttons onto garments and can save time and effort.
NOTE: If you are looking for a designer’s sewing machine, check this out: Best Sewing Machine for Clothing Designer