
Learn how to do an invisible stitch ( ladder stitch) on pants with this guide. An invisible stitch is a concealed sewing technique used to mend torn fabric edges, and in this tutorial, we’ll focus on repairing pants, specifically jeans.
Invisible Stitch On Pants – Step BY Step Guide
Performing an invisible stitch is a straightforward process that doesn’t require advanced sewing skills. The result is an almost completely invisible seam that gives your pants a polished and professional appearance. To master the art of creating an invisible stitch on your pants, follow the step-by-step instructions below.
Invisible Stitches/ Blind Stitches On Pants by Hand
Here are some steps for invisible or blind stitching through the hands and then through the machine.

Step 1.
Here the first step is to turn the backside of the garment out. Make boundaries on the fabric by marking them through a measuring tape for a sequence. When you have marked both boundaries. One boundary is 1/2″ and the other is probably 1″.
Step 2.
The second step is to turn the half boundary to the backside and fold it. If the fabric is easily foldable, it is well and good. But the fabric does not fold easily so press it.
Step 3.
The next step is to fold the other hem part twisting on the previous. Make sure to fold both marking parts. Now press this part again. When you press the fabric it becomes in the sequence and can stitch easily without making an effort.
Step 4.
Here the next step after folding is to thread the needle. I am going to tell you the way to thread the sewing needle. Take the sewing needle and thread it by using just a single strand of the matching color to the fabric. Make sure to thread the needle with a single strand. Put the thread in the needle and make a knot on the end of the thread.
Step 5.
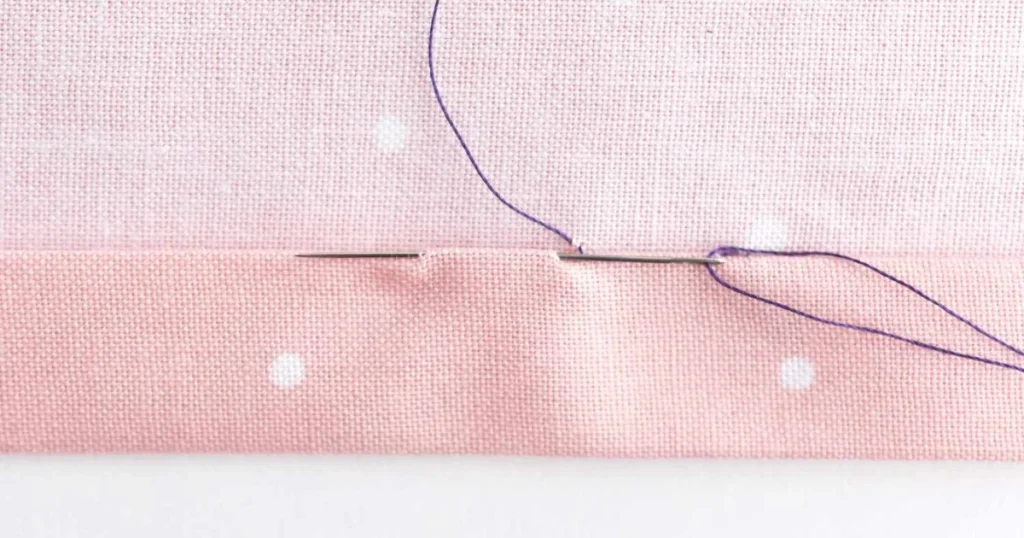
After the knot, take this thread. Start stitching the folded piece of the fabric taking a small distance from the main garments. Repeat this on the hem fold and make two to three stitches on the fabric. Go back to the main garment stitch in with the single thread and continue this.
The stitches made in that way are inside the hem and the garments. These are hidden when you open the fold. Now open it and press it gently to see the result. This is the way you can make invisible stitches on the pants by hand.
How to do a blind stitch on a sewing machine?
This is the way to do invisible or ( ladder stitches) on the pants by using the sewing machines. The first three steps are quite similar to the above method. I am going to tell you the steps which start from the step 4.
Step 4.
The next step is to thread the sewing machine needle. Make sure to thread the bobbin with the same color in the sewing needle as this color is the matching color with the fabric.
Step 5.
Put the fabric under the sewing machine to sew. Now select the blind hem stitch from the sewing machine. Now place the presser foot on the fabric as the needle is on the top of the extending edge borderline.
This stitch contains 5 straight and one zig-zag stitch. The straight stitches are on the folded hem and the zig-zag stitch comes on the main fabric one stitch’s thread goes under the fabric. Continue these steps to finish the length of the hem.
Step 6.
After the completion, you can see the blind stitch on the piece of the fabric. Now press the fabric to the right. You see the creased line on the hem. That line can be set when you press it by using iron.
RELATED GUIDE: How to Use a sewing machine – step by step
How to Sew an Invisible Stitch in Torn Jeans?
Certainly, here’s how to sew an invisible stitch in torn jeans:
Materials You’ll Need:
- Torn jeans
- Matching thread
- Sewing needle
- Scissors
- Pins (optional)
1. Choose the Right Thread
Select a thread color that matches your jeans. If you can’t find an exact match, go for a shade slightly darker to make the repair less noticeable.
2. Thread the Needle
Cut a length of thread (about 18 inches) and thread it through the needle. Tie a knot at the end of the thread.
READ MORE: How to Choose the Right Sewing Machine Needle?
3. Position the Jeans
Lay your torn jeans on a flat surface, with the torn edges aligned as closely as possible.
4. Start from the Inside
Turn your jeans inside out. This is where you’ll make your invisible stitch.
5. Align the Edges
Gently align the torn edges of the fabric, making sure they are flush with each other.
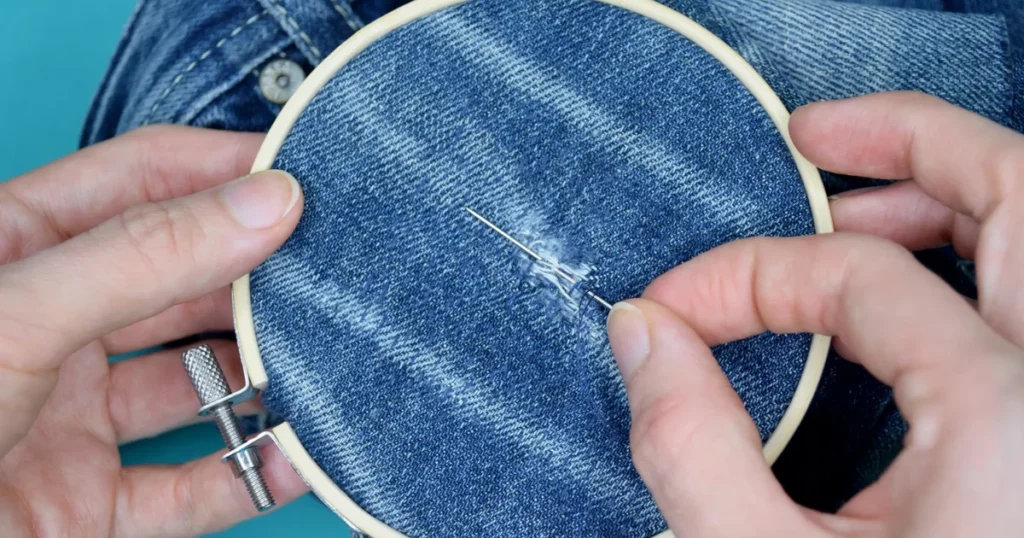
6. Begin the Stitch
Insert the needle from the inside of the jeans, coming out near the torn edge. Start with a small stitch (about 1/8 inch) to secure the thread.
7. Make Tiny Stitches
Continue stitching along the torn edge with small, evenly-spaced stitches. Try to make the stitches as tiny as possible for the best result.
8. Keep it Tight
Ensure the thread is pulled tight as you stitch. This will help bring the torn edges together seamlessly.
9. Finish the Repair
When you’ve sewn the entire length of the tear, tie a knot on the inside of the jeans to secure the thread. Trim any excess thread.
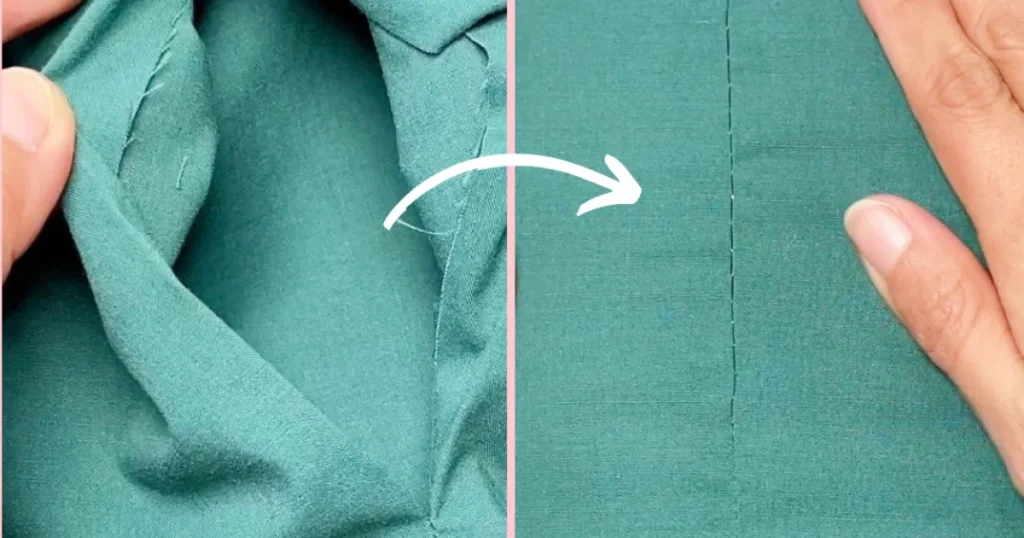
10. Check the Front
Turn the jeans right side out and inspect the front. Your invisible stitch should be nearly invisible, with the tear edges neatly joined.
11. Optional: Iron the Repair
If your jeans are made of a fabric that can be ironed, you can lightly press the repair with an iron on a low heat setting to make it even less noticeable.
Your torn jeans are now repaired with an invisible stitch, and you can confidently wear them again without the tear showing. This method is not only effective but also budget-friendly, saving you from replacing your favorite pair of jeans.
RELATED GUIDE: How To Make Patches With An Embroidery Machine
What Is Invisible Stitch?
The invisible stitch also referred to as a ladder stitch, slip stitch, or blind stitch, is a hand-sewing technique that discreetly joins the fabric, ensuring the thread remains hidden in the final product.
This method is commonly employed for mending seams, closing cushions and toys, and affixing linings. By picking up only a few threads of fabric at a time, the resulting seam becomes virtually imperceptible.
What Is An Invisible Stitch Used For?
The invisible stitch, also known as the ladder stitch, serves a variety of practical purposes and is especially valuable for mending tasks. This versatile sewing technique is employed in the following scenarios:
1. Repairing Soft Toys
The invisible stitch is a common choice for sewing or repairing stuffed toys. Whether you’re crafting a toy from a pattern or restoring a well-loved teddy bear or bunny, this stitch can help rejuvenate cherished companions that have seen better days.
2. Mending Garments
It proves invaluable for fixing torn seams and sealing openings in clothing and hats, preparing them for topstitching. This discreet stitch can extend the life of your favorite garments.
3. Pillow-Making
When it comes to assembling pillows, the ladder stitch is an excellent choice for achieving an invisible closure. It leaves no visible seam, resulting in a polished and seamless finish.
The invisible stitch, with its ability to create inconspicuous joins and repairs, is a valuable skill for any sewing enthusiast. Whether you’re preserving memories through toy restoration, enhancing the longevity of your clothing, or perfecting your pillow-making projects, mastering this technique can greatly enhance your sewing repertoire.
Are invisible stitches strong?
Yes! The invisible stitches are strong, this stitch is mostly used on the seams and the fabric which are breakable. You do not see this stitch even when the task is accomplished.
What is the purpose of the blind stitch sewing machine?
Blind stitch is used to stitch the folded pieces of the fabrics. This stitch is invisible and we do not see this stitch easily. Mostly this stitch is used for ideal stitching. You can view this by pulling both fabrics away.
How to fold a blind stitch fabric?
Take the marker and mark 1/2″ of the fabric then again mark the 1″ on the fabric. Now fold the first 1/2″ and then fold the other 1″.
Why is my blind stitch machine not catching?
If the machine is not catching the stitching, maybe the issues with the length of the stitch. Increase the stitch length and then see, if there must be a change in the stitch and the machine starts catching the stitch.