How To Thread a Bobbin?
The bobbin is an essential part of the machine, you should learn how to thread a bobbin. Here is the proper guide on threading the bobbin. If you are searching to thread a sewing machine, then you are absolutely at the right place. Here I am going to tell the details about the topic thoroughly. I can provide you with a Step By Step Guide on Threading a Sewing Machine Bobbin.
How To Thread a Bobbin? GUIDE TO FOLLOW
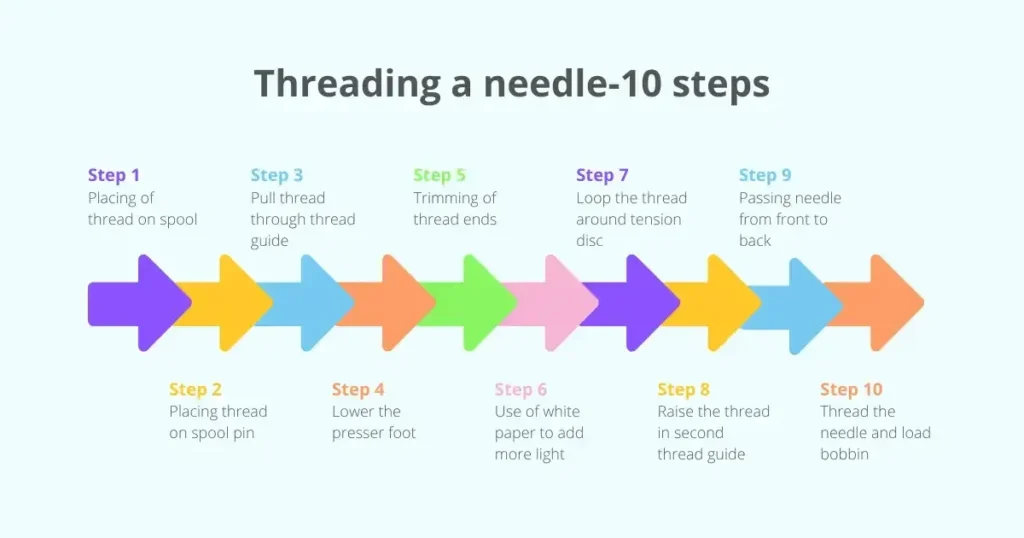
Threading a bobbin doesn’t need to be complicated, and in this article, we’ll break it down into simple, easy-to-follow steps. Whether you’re new to sewing and looking for guidance or a seasoned pro wanting a quick reminder, our aim is to help you master this essential skill.
By the time you finish reading this article, you’ll be threading bobbins with confidence and precision. So, let’s dive in and get your sewing projects back on track!
Step 1. Remove the Plastic Cover from the bobbin
The first step is to remove the plastic cover from the bobbin. When the bobbin is in the box, it is enclosed in a plastic cover. You have to remove the plastic cover from the sewing machine bobbin.
The covers are used for safety and also cover the thread while you are using a sewing machine. Removing this cover is very important, so remove it.
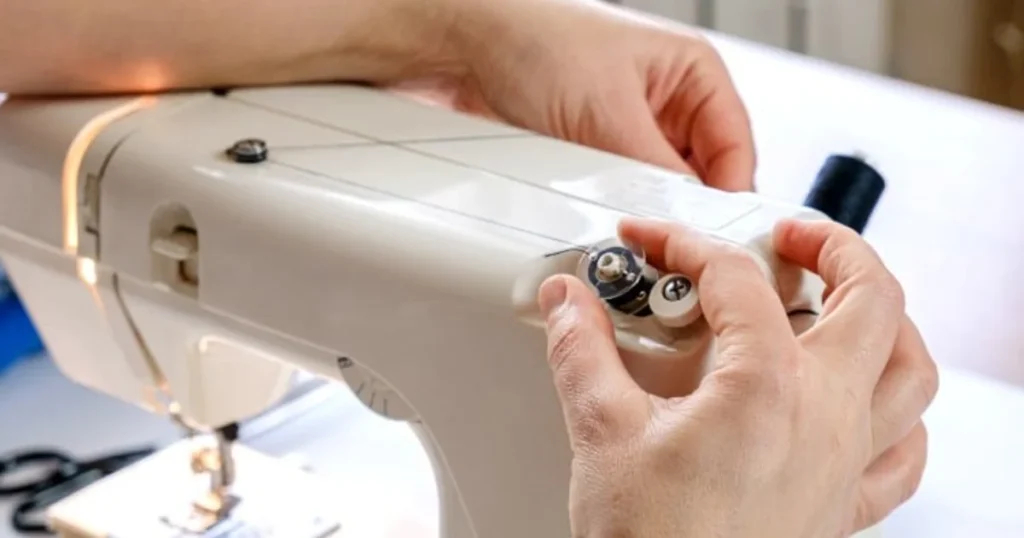
Step 2. Place the bobbin on the handle
The second step for threading a sewing machine bobbin for threading bobbin is to put the bobbin on the handle. The handle is the specified place where you have to put the thread and the bobbin to make them join.
When you put the bobbin on the handle, put the thread on the other stand or handle. This handle is used to wound the bobbin. It is not only the one way to thread the bobbin. You can thread the bobbin where your bobbin is going to attach, but we probably choose the above way.
Step 3: Guide the thread to the way
When your bobbin is set on the handle, you must guide the thread to reach the sewing machine bobbin. Here are some formalities that the thread has to fulfil to reach the bobbin.
Pass the thread through the way which leads it to the bobbin. Here are some tension disks, and hangers, on which you can hang and pass through the tension disks. These tension disks are made in a way to makes the thread good.
Ensure no hurdle comes in the way when you are stitching the fabrics. It leads the thread to pass neatly and creates no issue in the sewing process.
Step 4. Wrap the thread and start winding
Here you have to wrap the thread on the bobbin. You have to wrap the thread twice to three times, which is enough. After this wrapping, put the bobbin on the stand. Hold a part of the thread in your hand. do not release it.
The holding part helps you to wound the bobbin as it indicates the direction. Do not leave that side of the thread as this side helps the bobbin to move. If you leave it, it can be wrapped around the bobbin. So hold it and wound the thread on the bobbin.
Step 5. Turn the sewing machine on
Here you have to turn the sewing machine on. Press the pedal with your foot and leave it pressed until the bobbin is not wound completely. The wounding of the bobbin completely depends on you.
If you want to do a lot of work, then you can wound the bobbin completely until it does not get over. But if you need it in small quantity then you can fill it according to your requirements.
Step 6. Bobbin comes to a stop
The other step is the bobbin coming to a stop. When the bobbin is filled with the thread completely, it comes to a stop. That point can automatically stop the bobbin from filling more. If you need less thread you can make a stop and not fill the bobbin enough which remains. So you can save your thread and use it when it is required.
Step 7. Pull the winder back
The next step is to pull the bobbin from the winder back. Pull it back in the previously ordered form. When you are going to pull it back cut the thread. Remove the bobbin.
When the bobbin comes to a stop you must have to follow the steps that are mentioned above. Pulling the winder back from left to right.
Whenever you do this work, put the bobbin in the place from where it continues the sewing. Put it in the place where the other thread meets and it starts sewing the fabric.
READ ALSO: How to use a sewing machine step by step
How to Wind a Bobbin?
Here are step-by-step instructions on how to wind a bobbin:
Materials:
- Thread
Tools:
- Sewing machine
- Bobbin
- Scissors
Instructions:
- Place a spool of thread on the thread spool pin.
- Slide the spool pin cap onto the pin and secure it against the thread spool.
- If not already in position, push the bobbin winder pin to the left.
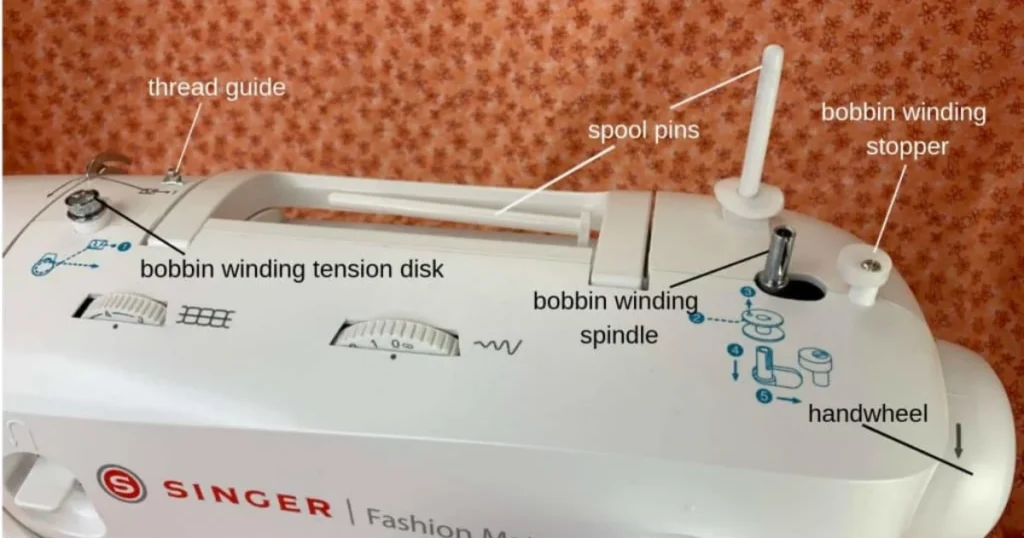
- Feed the thread from the spool through the thread guide.
- Pass the thread end through the small hole on the inside rim of the bobbin.
- Place the bobbin onto the bobbin pin.
- Push the bobbin winder pin to the right to engage it.
- Hold onto the thread end and press the foot pedal or speed controller at full or fast speed until the bobbin is fully wound. The winding will automatically stop when the bobbin is full.
- Cut the thread.
- Push the bobbin to the left and remove it from the bobbin winder pin.
- Trim any excess thread ends from the top of the bobbin.
Following these steps will help you wind a bobbin correctly for your sewing projects.
How to wind a bobbin Tips:
Here are some essential tips to consider when winding your bobbin:
Wind Clockwise: Always wind the thread onto the bobbin in a clockwise direction.
Optimal Speed: Once you’ve placed the bobbin on the bobbin winding pin, operate your sewing machine at its highest speed setting or fully depress the pedal to wind the bobbin quickly and efficiently.
Consult Your Manual: It’s crucial to refer to your sewing machine’s manual. The manufacturer provides precise instructions tailored to your specific make and model of sewing machine.
Select the Correct Bobbin: Not all sewing machines use the same size or type of bobbin. For example, my Janome sewing machine utilizes a size J plastic bobbin that loads from the top. To determine the appropriate bobbin for your machine, consult your sewing machine manual.
By following these guidelines, you’ll ensure a smooth and effective bobbin winding process, enhancing your overall sewing experience.
READ ALSO: How to thread a sewing machine?
FAQs:
How much thread does a bobbin hold?
The amount of thread on the bobbin depends completely on the size of the bobbin. Sometimes it depends on the consistency of the thread. If the thread is thick, it can hold less thread and fill gradually. Otherwise, the sewing machine bobbin can hold more thread.
How much do you have to tighten the bobbin?
You have to tighten the thread of the sewing machine bobbin. Tension in that thread is essential to sewing well. If there is not no tension in the thread, the thread can create issues and can occur problems in the embroidery.
Why the bobbin jams?
The main reason behind the bobbin jamming is unnecessary tightness. Ensure to tighten the bobbin only which is necessary otherwise, you do not have to tighten it enough. Whenever the machine starts jamming, check the tension in the bobbin, clear that issue, and continue doing your work.
Which thread of the sewing machine does the bobbin hold?
The lower thread of the sewing machine a bobbin holds. The bobbins are specially designed to provide threads to the sewing machine from the lower part. Lower and upper threads are important when you are going to stitch something.
Related Post: How to make a pillow cover?
Related Post: Best Sewing Machine For Wedding Dresses
Conclusion:
In conclusion, mastering the art of threading a bobbin is a fundamental skill for anyone in the world of sewing. By following the clear and concise steps outlined in this guide, you’ll find that this task becomes second nature in no time.
Whether you’re a beginner or an experienced seamstress, a well-threaded bobbin is the foundation of successful and stress-free sewing.
So, keep these instructions handy, and you’ll be well on your way to creating beautiful stitches and bringing your sewing projects to life with confidence and precision.